
Page 36: of Marine Technology Magazine (Jan/Feb 2023)
Read this page in Pdf, Flash or Html5 edition of Jan/Feb 2023 Marine Technology Magazine
 35
35

 37
37
LANDER LAB #6 SPLICING UNDERWATER ELECTRIC CABLES
Figure 6 Figure 7
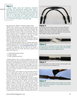
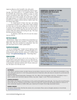
Wrapping Scotch? ll over the splice. Start in the center to build up the diameter to the original jacket OD, then one last wrap that covers the splice plus an inch over each cable end.
The completed cold splice, capable of working in any ocean at any depth. MacArtney locking sleeves can be added to
BH and MCBH connectors after the splice is made.
did ship, and you can watch for the package heading your way. 3. On one cable end to be spliced, cut the black con-
When specifying a custom cable, allow extra length for a cir- ductor to 1/2”, and leave the white conductor a full 1” long. cuitous cable run and a ? nal bend radius to mate to a bulkhead 4. With the second cable end to be spliced, cut the connector. Any excess length can be coiled and secured within conductor lengths the opposite, that is, what was longest on the lander frame. Better a little too long than not long enough. the ? rst cable is the shortest on the second. In this case, cut
There are small service shops here and there who may do the white conductor to ½” long and leave the black conductor potted splices as a sideline to support their customers. They at 1”. This procedure offsets the two solder joints from each can do good work, but they have to play up to the level of the other so they are not located side-by-side, preventing solder big companies, including post-production QC. spikes from inadvertently pressing through the insulation un-
Still, it’s a fair bet that a cable will get mangled at sea and der pressure and shorting to a neighboring solder joint. The a ? eld repair will be necessary. A group can be ready for un- overall diameter of the ? nished splice is also reduced.
foreseen events by developing an in-house splicing capabil- 5. Strip ¼” of the insulation off the end of each of the ity. “Don’t miss the boat” is a real thing in our industry. Be wires. Tin each of the four bare ends with a soldering iron.
prepared with cold splice materials, and have practiced before 6. Starting with the black wire, place approximately you need to do it when it really matters. 3/8” long marine grade shrink tubing on the long wire before soldering. Marine grade shrink tubing comes is shrink ratios of
COLD SPLICE 2:1 (default), 3:1, and 4:1. Pick an appropriate size for the task.
What is needed: 7. Solder the black wires together. Inspect the sol-
Diagonal cutters der joint for good ? ow and that the wires are parallel and in
Wire stripper close contact. Give each solder joint a light tug to be sure it
Heat shrink gun is fused well.
Marine grade heat shrink 8. Center the 3/8” long heat shrink over the joint, and Small size for individual wires use a heat gun to shrink the tubing. There will be about 1/16” 3M™ Scotch? l™ Electrical Insulation Putty overlap onto the wire jacket on either side of the solder joint.
3M™ Super 33+ Vinyl Electrical Tape 9. Perform a continuity check to be sure the conduc- 3M™ ScotchKote™ Electrical Coating FD Putty tors go where you expect them to by testing each pin 1-1 and
Scripps seagoing personnel have utilized a technique known 2-2. Also check for shorts by testing 1-2.
as “cold splicing” to make or repair underwater electrical in- 10. If needed, tie the wire bundle with kite string to terconnect cables. It requires the use of three 3M products: keep the wire splices close to the center and away from the
Scotchkote electrical coating, Scotch? l electrical insulation outer surfaces of the overmolding.
putty, and Scotch Super 33+ black tape. 11. Using 100-grit sandpaper, rough the outer cable
The technique for an unshielded 2-conductor SOO cable is jacket 2 inches to either side of the splice.
as follows: 12. Using isopropyl alcohol, clean the outer cable 1. Strip back the outer jacket from the end ½” for jacket 2 inches to either side of the splice, as well as the each conductor. If present, a braided shield counts as one con- spliced wire jackets and heat shrink. Let dry completely.
ductor. For a 2-conductor unshielded cable, strip 2 x 1/2”, or 13. Using the brush attached to the inside of the lid, 1”, of the outer jacket off the end of each cable. I use small or an acid brush, paint the entire cleaned jacket area with diagonal cutters to get underneath the outer jacket without Scotchkote. Using the brush bristles, encourage it to ? ow into nicking the insulating jacket on the conductor. every nook and cranny. Do this over cardboard because it will 2. Clip out the cable bulk ? ller material, like jute. drip. Let the Scotchkote dry completely. This is a primer that 36 January/February 2023
MTR #1 (34-47).indd 36 1/23/2023 3:16:34 PM